Building an OCI Generative AI Agent
OIC Log Analysis – From Knowledge Base to a Python Chat Application A step-by-step walkthrough: OCI Bucket → Data Source → Knowledge Base → Generative AI Agent → Endpoint → Chat (Console & Python)
Introduction
Oracle Integration Cloud (OIC) support teams spend a significant amount of time digging through integration logs to answer a simple question: “why did this integration fail?” Error messages are often technical, scattered across multiple integrations, and hard to search using keywords alone.
This blog walks through a working example of an OIC Log Analysis Assistant, built entirely on Oracle Cloud Infrastructure (OCI) Generative AI Agents. The assistant lets a support engineer simply type a question in plain English – such as “List the errors occurred in Integrations” – and get back a structured, human-readable summary drawn from historical OIC error logs.
Beyond testing the agent in the OCI console, this update also shows how to retrieve the Agent Endpoint and call it programmatically from a Python application – the same pattern any chatbot, web app, or automation script would use to talk to the agent.
The end-to-end flow covered in this document is:
Store historical OIC error logs in an OCI Object Storage Bucket.
Create a Data Source that points the Generative AI service at that bucket.
Create a Knowledge Base that ingests and indexes the data source.
Create a Generative AI Agent that uses the Knowledge Base to answer questions.
Test the assistant using the built-in Console Chat interface.
Retrieve the Agent Endpoint OCID/URL from the Agent's Endpoints tab.
Call the agent from a simple Python client to simulate a real chat application.
Architecture
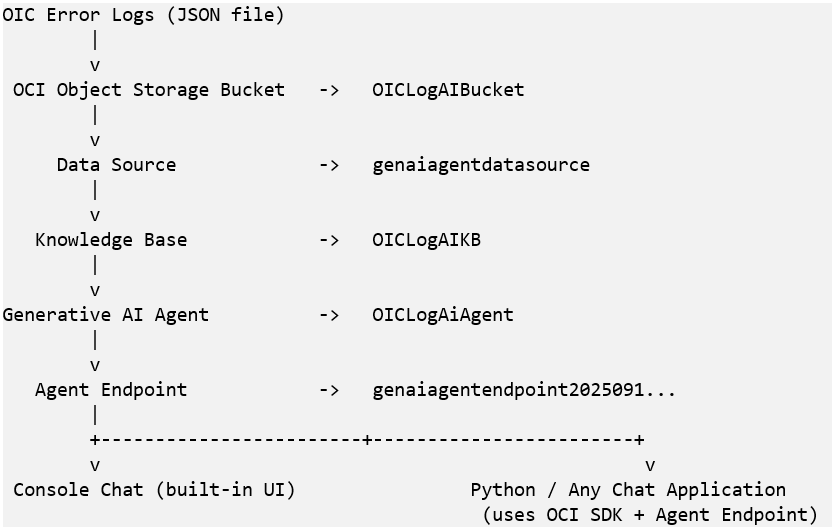
Every stage in this pipeline maps directly to a resource inside the Generative AI Agents section of the OCI console, under Analytics & AI. The next sections walk through each of these resources in the order they need to be created, using the actual screens captured from the console, followed by a Python example that connects to the agent through its endpoint.
Step 1: Create an OCI Object Storage Bucket and Upload the Logs
The first step is to create a standard OCI Object Storage bucket that will hold the historical OIC diagnostic files. This bucket becomes the raw source of truth that the Generative AI service will later index.
In this example the bucket is named OICLogAIBucket, and it stores the following objects:
OIC Error JsonOIC AI Error Data.json – a structured JSON export of historical OIC integration errors.
using-integrations-oracle-integration-3.pdf – supporting Oracle Integration documentation.
A TEST/ folder used for staging additional files.
OCI Object Storage bucket objects Figure 1: OICLogAIBucket – Objects tab showing the uploaded OIC error log files.
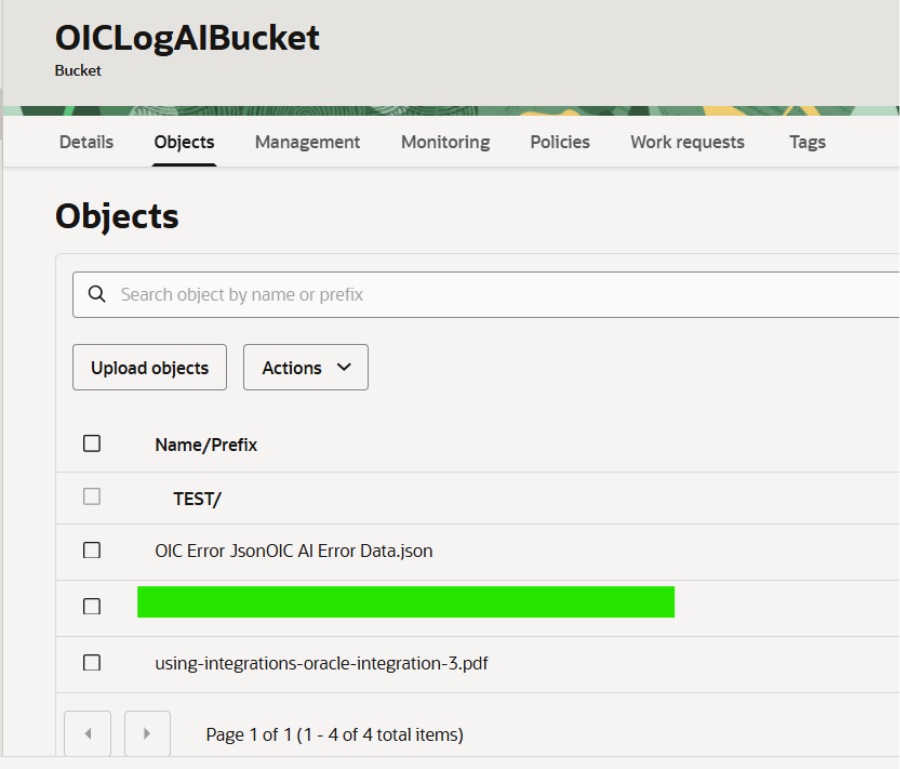
Figure 1: OICLogAIBucket – Objects tab showing the uploaded OIC error log files.
Sample Log Content
The uploaded JSON file contains an array of historical error records, each capturing the batch id, integration name, and error message returned by OIC. A few representative entries are shown below.
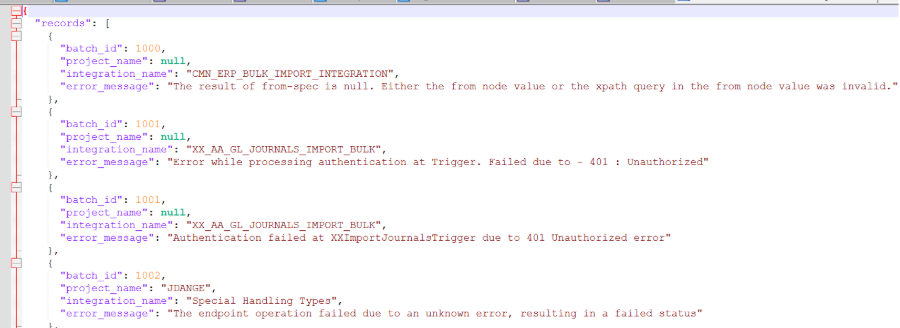
Figure 2: Sample content of OIC Error JsonOIC AI Error Data.json opened in a text editor.
Key fields captured for every error record:
Field | Description |
batch_id | Identifier of the OIC integration run/instance. |
project_name | Optional business project associated with the run. |
integration_name | Name of the OIC integration flow that raised the error. |
error_message | The exact error text captured from the OIC diagnostic logs. |
Recommended file formats for the bucket include JSON, TXT, PDF, and CSV. The richer and more structured the uploaded content, the better the quality of the answers the agent will eventually produce.
Step 2: Create a Generative AI Data Source
With the bucket in place, the next step is to create a Data Source inside Generative AI Agents. The data source is the connector that tells the service where the raw content lives – in this case, the OICLogAIBucket created in Step 1.
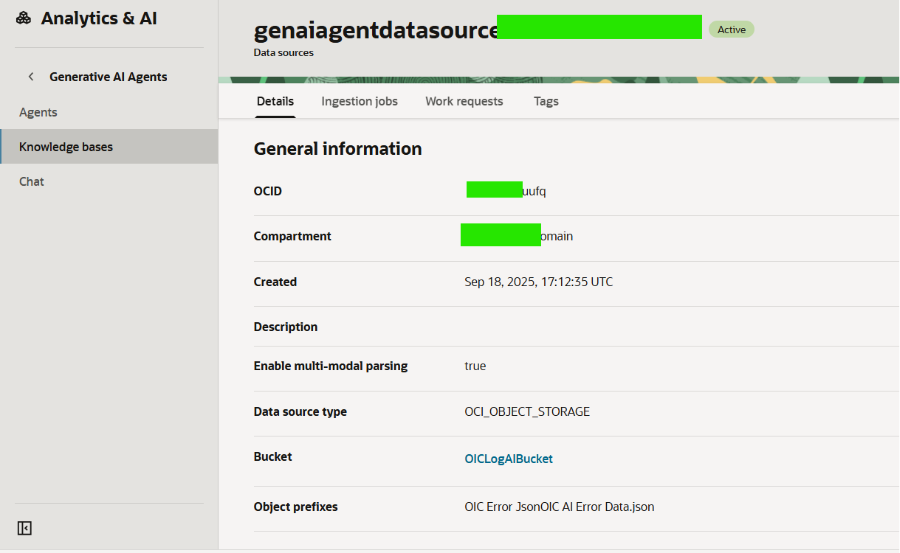
Figure 3: genaiagentdatasource – Data source details showing type OCI_OBJECT_STORAGE, the linked OICLogAIBucket, and the ingested object prefix.
Enabling multi-modal parsing allows the data source to also process embedded images or diagrams if they exist in the uploaded documents, which is useful when troubleshooting guides contain screenshots.
Step 3: Create a Knowledge Base
The Knowledge Base is the piece that turns raw files into something an AI agent can actually reason over. When a Knowledge Base is created and linked to a data source, the service automatically chunks the documents, generates embeddings, and builds a searchable index – enabling semantic, natural-language search instead of simple keyword matching.
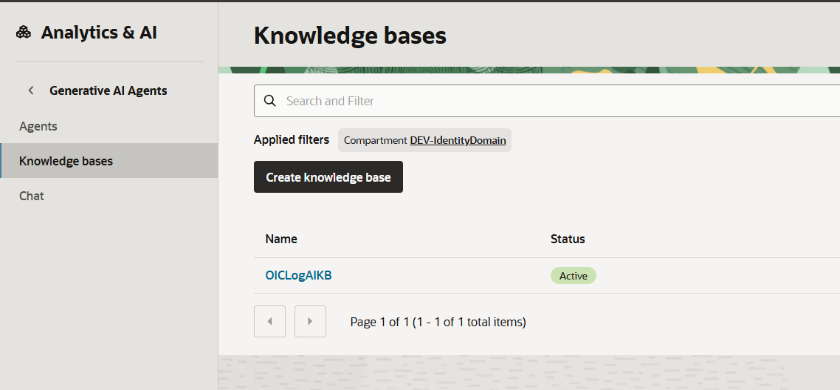
Figure 4: Generative AI Agents – Knowledge bases list showing OICLogAIKB in Active status.
Knowledge Base Details
Opening OICLogAIKB shows the general configuration of the knowledge base, including its type, size, and whether hybrid search is enabled. Hybrid search combines keyword and vector-based semantic search, which improves recall for error-message style queries that mix exact codes (like “401 Unauthorized”) with natural language.
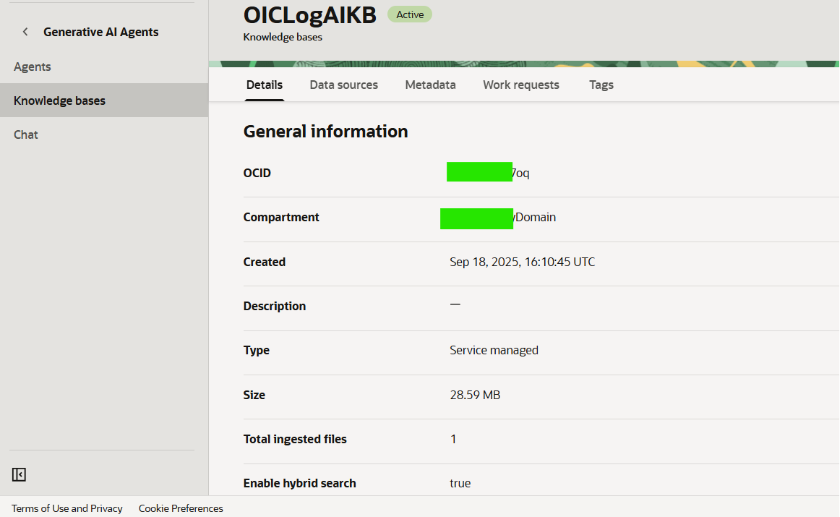
Figure 5: OICLogAIKB – Details tab showing type Service managed, size 28.59 MB, 1 ingested file, and hybrid search enabled.
Associating the Data Source
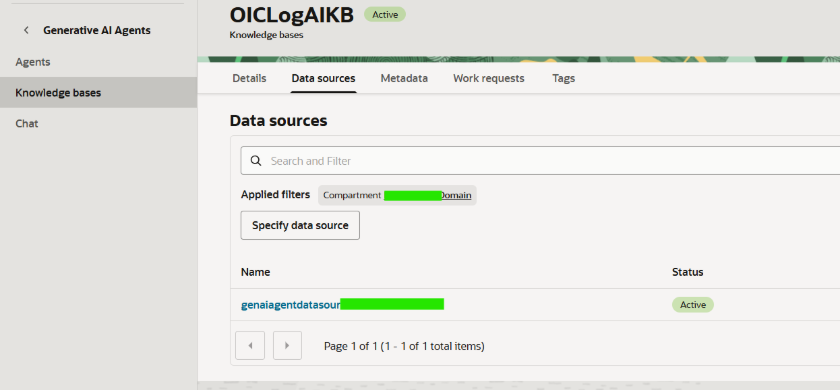
On the Data sources tab of the knowledge base, the previously created genaiagentdatasource is attached. Once associated, the knowledge base automatically kicks off an ingestion job that reads the bucket contents through the data source and indexes them.
Step 4: Create the Generative AI Agent
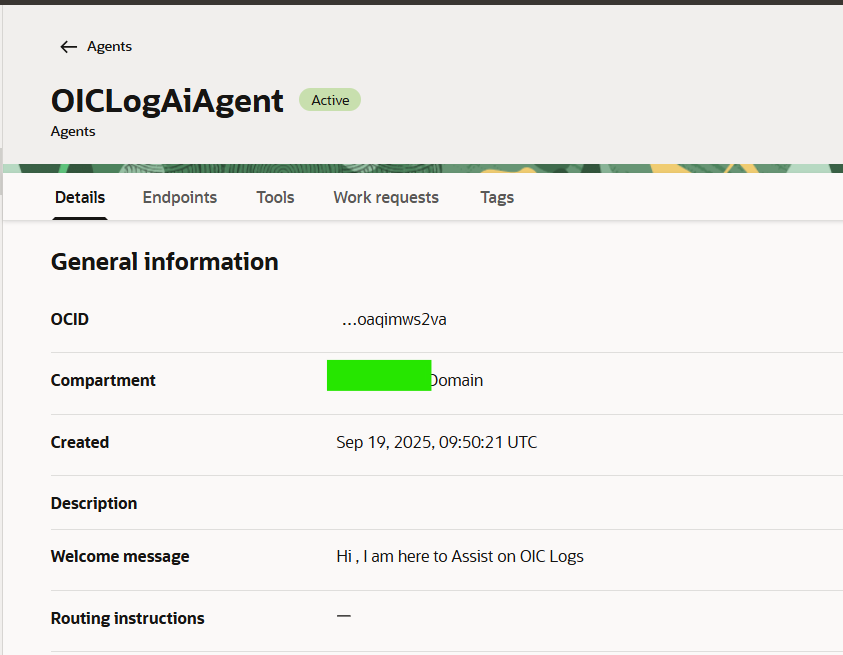
With an active Knowledge Base in place, the next step is to create the Generative AI Agent itself and point it at that knowledge base. The agent is the conversational layer: it receives the user's question, retrieves relevant chunks from the knowledge base (Retrieval Augmented Generation), and uses the underlying language model to compose a natural-language answer.
Suggested Agent Instructions
A short system instruction helps the agent stay focused on OIC support scenarios and respond in a consistent, support-friendly format:
You are an Oracle Integration Cloud support assistant.
Answer questions using the knowledge base only.
When responding:
Identify the integration involved.Explain the error in plain language.Suggest a likely root cause.Reference matching historical incidents if available.
If the information is not available in the knowledge base,
state that clearly instead of guessing.
Step 5: Test the Agent Using the Console Chat
Once the agent is active, it can be tested directly from the Chat page under Generative AI Agents. Selecting the OICLogAiAgent and its endpoint opens a conversational window where any support engineer can type a plain-language question about OIC integrations.
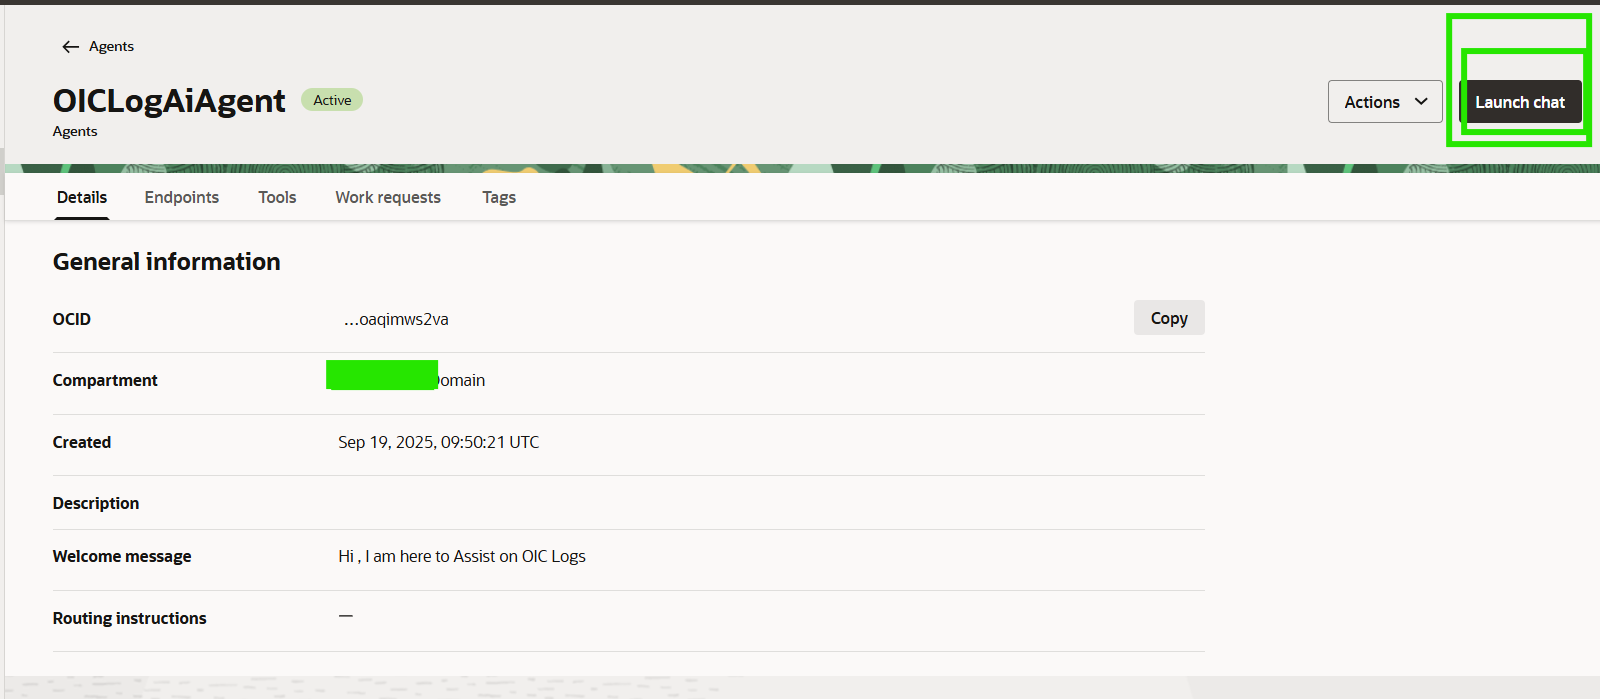
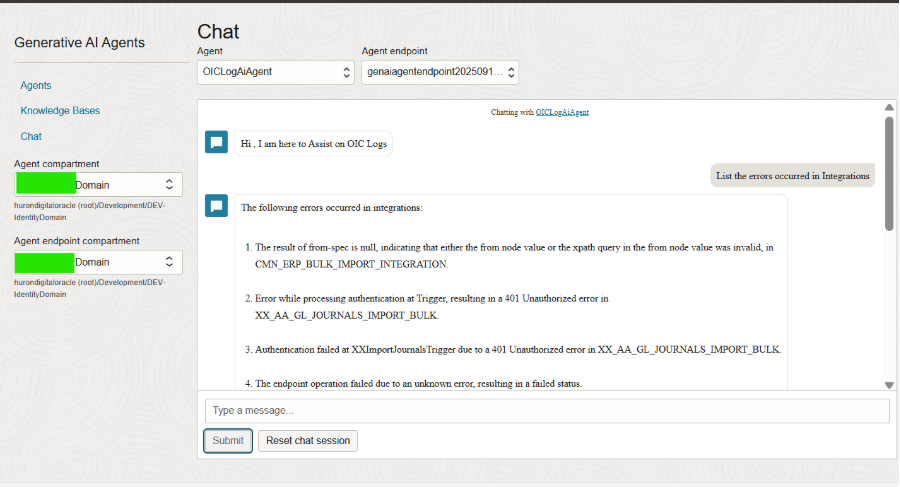
Figure 7: Chat interface – the user asks “List the errors occurred in Integrations” and OICLogAiAgent returns a structured summary sourced from the Knowledge Base.
In this example, the question “List the errors occurred in Integrations” returns a numbered summary that includes the affected integration name and the underlying error for each entry, for example:
An invalid from-spec / XPath error in CMN_ERP_BULK_IMPORT_INTEGRATION.
A 401 Unauthorized error while processing authentication at Trigger in XX_AA_GL_JOURNALS_IMPORT_BULK.
Authentication failures at XXImportJournalsTrigger due to a 401 Unauthorized error.
An unknown endpoint operation error resulting in a failed status.
Because the agent is grounded in the Knowledge Base rather than general model knowledge, every answer is traceable back to an actual historical log entry, which makes the responses far more trustworthy for troubleshooting.
More Example Questions to Try
Why did authentication fail in the Journal Import integration?
Find integrations that failed due to unauthorized access.
What are the common causes of a failed status error?
List all errors for ERP bulk import integrations.
Explain the XPath validation error in CMN_ERP_BULK_IMPORT_INTEGRATION.
Retrieve the Agent Endpoint for Programmatic Access
The Console Chat page is great for quick validation, but a real chatbot application – whether it is a Python script, a web app, a Teams/Slack bot, or a mobile app – talks to the agent through its Agent Endpoint using the OCI SDK or REST API, not through the console UI.
Every Generative AI Agent exposes one or more endpoints under its Endpoints tab. This endpoint OCID is the value your application code will use to open a chat session and send messages to the agent.
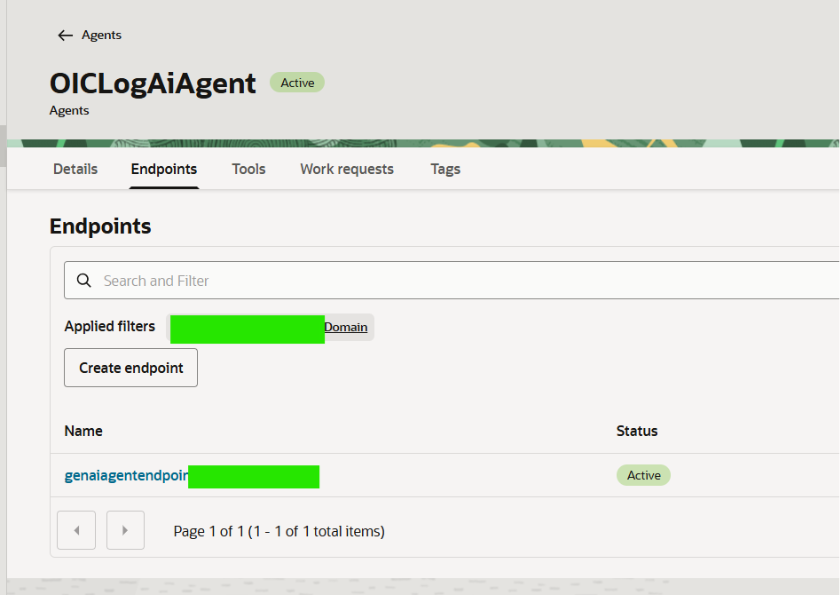
Figure 8: OICLogAiAgent – Endpoints tab showing genaiagentendpoint in Active status. The endpoint OCID is used by client applications to connect to the agent.
To retrieve the endpoint:
Open the agent (OICLogAiAgent) in the Generative AI Agents console.
Select the Endpoints tab.
Copy the endpoint name/OCID shown in the list (for example, genaiagentendpoint2025091...) – this is the AGENT_EP_ID your application will call.
Note the region-specific Generative AI Agent runtime service URL (for example, https://agent-runtime.generativeai.us-chicago-1.oci.oraclecloud.com) – this is the SERVICE_EP your application will connect to.
Key Point: Because authentication to the endpoint uses your standard OCI configuration/API signing key (the same config used by the OCI CLI and SDKs), any application that can present valid OCI credentials – Python, Java, Node.js, a REST client, or a low-code chatbot platform – can call this same endpoint. The agent itself is not tied to any single application or language.
Build a Simple Python Chat Application
With the Agent Endpoint in hand, we can build a minimal Python console application that opens a session with the agent and lets a user ask questions in a loop – effectively a command-line chat application backed by the OICLogAiAgent.
The script uses the OCI Python SDK's generative_ai_agent_runtime module, which provides the client, session, and chat operations needed to talk to a Generative AI Agent endpoint.
Prerequisites
Python 3.8+ with the oci SDK installed (pip install oci).
A configured OCI CLI/SDK config file at ~/.oci/config with a valid profile (API signing key based authentication).
The Agent Endpoint OCID captured in Step 6.
The colorama package for colored console output (pip install colorama) – optional, used only for readability.
Sample Code: ChatwithGENAIAgent.py
import oci
from oci import generative_ai_agent_runtime
import json
from colorama import Fore, Back, Style

CONFIG_PROFILE = "DEFAULT"
config = oci.config.from_file("~/.oci/config", CONFIG_PROFILE)

# AI Agent service endpoint
SERVICE_EP = "https://agent-runtime.generativeai.<your-region>.oci.oraclecloud.com"  # Update this with the appropriate endpoint for your region
AGENT_EP_ID = "ocid1.genaiagentendpoint.oc1.<your-region>.<your-agent-endpoint-ocid>"
welcome_msg = "Welcome to AI Agent - OICLog"

def gen_Agent_Client():
    # Initialize AI Agent runtime client
    genai_agent_runtime_client = generative_ai_agent_runtime.GenerativeAiAgentRuntimeClient(
        config,
        service_endpoint=SERVICE_EP,
        retry_strategy=oci.retry.DEFAULT_RETRY_STRATEGY
    )
    create_session_details = generative_ai_agent_runtime.models.CreateSessionDetails()
    create_session_details.display_name = "Welcome to AI Agent"
    create_session_details.idle_timeout_in_seconds = 30
    create_session_details.description = welcome_msg

    return create_session_details, genai_agent_runtime_client

def Quest_Answer(user_question, create_session_details, genai_agent_runtime_client):
    # Create a Chat Session for AI Agent
    try:
        create_session_response = genai_agent_runtime_client.create_session(
            create_session_details,
            AGENT_EP_ID
        )
    except:
        create_session_details, genai_client = gen_Agent_Client()
        create_session_response = genai_client.create_session(create_session_details, AGENT_EP_ID)

    # Define Chat details and input message/question
    session_details = generative_ai_agent_runtime.models.ChatDetails()
    session_details.session_id = create_session_response.data.id
    session_details.should_stream = False
    session_details.user_message = user_question

    # Get AI Agent Response
    session_response = genai_agent_runtime_client.chat(
        agent_endpoint_id=AGENT_EP_ID,
        chat_details=session_details
    )
    return session_response

print(Style.BRIGHT + Fore.RED + welcome_msg + Style.RESET_ALL)

ses_details, genai_client = gen_Agent_Client()

while True:
    question = input("Enter text (or Enter to quit): ")
    if not question:
        break

    print(Style.DIM + "************ Question for AIAgent ************")
    print(Style.BRIGHT + Fore.RED + question + Style.RESET_ALL)

    chat_response = Quest_Answer(question, ses_details, genai_client)

    print(Style.DIM + "************ Answer from AIAgent ************")
    print(Fore.MAGENTA + chat_response.data.message.content.text + Style.RESET_ALL)

print("*** The End  ***")
What the Code Does
Loads OCI credentials from the local config file (config = oci.config.from_file(...)), the same profile used by the OCI CLI.
Creates a GenerativeAiAgentRuntimeClient pointed at the region's SERVICE_EP.
Opens a chat session against the AGENT_EP_ID (the endpoint copied in Step 6) using create_session().
Sends each user question to the agent via chat(), passing the session id and the question text.
Prints the agent's natural-language answer (chat_response.data.message.content.text) back to the console in a simple read-question, print-answer loop.
Running the Application
The script can be run from any Python-capable IDE or terminal. The screenshot below shows it running inside Visual Studio Code, where the file ChatwithGENAIAgent.py is executed and the user asks “List the Integrations that are in error” directly from the integrated terminal.
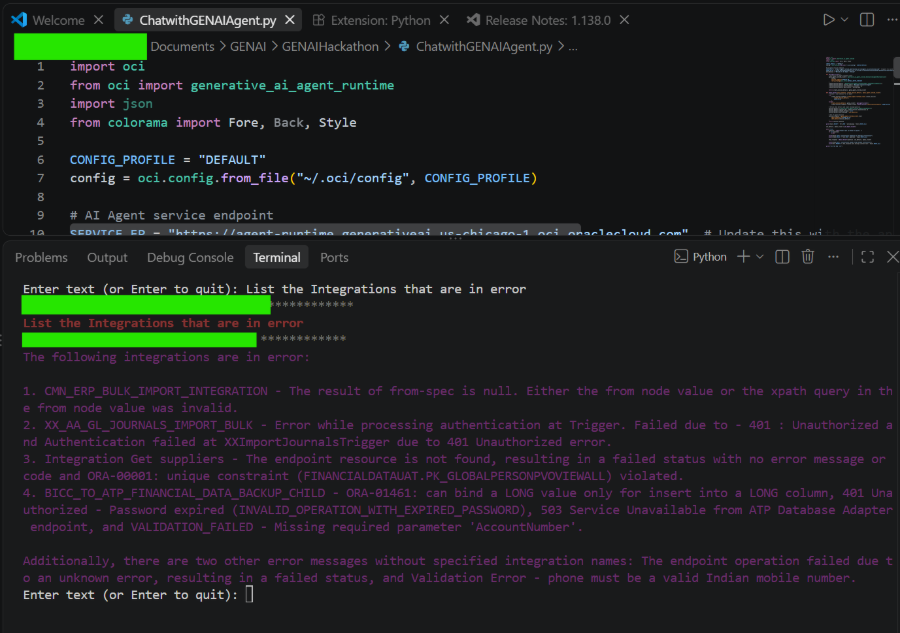
Figure 9: ChatwithGENAIAgent.py running in the VS Code terminal – the Python client sends the question to the OICLogAiAgent endpoint and prints the grounded answer back to the console.
The response returned in the terminal matches the same grounded, Knowledge-Base-sourced answers seen earlier in the Console Chat test, confirming that the Python client is talking to the same agent and endpoint.
Important: This Python script is intentionally minimal and is provided only as a basic example to illustrate how to open a session and exchange messages with a Generative AI Agent endpoint. It does not include production concerns such as robust exception handling, retry/backoff logic, secure credential storage, session reuse across requests, streaming responses, or input validation. Treat it as a starting template rather than a production-ready chat client.
Using the Agent in Any Chatbot Application
The Python example in Step 7 is just one possible client. Because the Generative AI Agent is exposed as a standard, authenticated OCI Agent Endpoint, the same integration pattern – create a session, then send chat messages against that session – can be reused from virtually any application stack, not just Python console scripts.
The same OICLogAiAgent endpoint could equally be called from:
A web application (Node.js, Java, .NET) using the corresponding OCI SDK or the REST API directly.
A Microsoft Teams or Slack bot that forwards user messages to the endpoint and posts the response back into the channel.
An Oracle APEX or OIC-based application, calling the agent through a REST connector as part of a larger business process.
A mobile application, where the endpoint call happens from a backend service layer that holds the OCI credentials.
Low-code/no-code chatbot platforms that support custom REST or SDK-based actions.
In every case, the two pieces of information required stay the same: the region's Agent Runtime service endpoint (SERVICE_EP) and the specific Agent Endpoint OCID (AGENT_EP_ID) retrieved in Step 6, combined with valid OCI authentication (API signing key, instance principal, or resource principal depending on where the client runs).
Key Point: Because authentication and session handling are decoupled from any specific programming language, teams can prototype quickly in Python (as shown above) and later re-implement the same calls in whatever language or platform powers their production chatbot, without changing anything on the agent, knowledge base, or data source side.
Benefits of This Approach
Faster troubleshooting – support engineers can locate similar historical incidents instantly instead of manually searching logs.
Self-service support – business users can ask questions in plain English without needing deep OIC expertise.
Knowledge retention – institutional troubleshooting knowledge stays available even as support personnel change.
Improved resolution time – common integration issues are identified and resolved much faster.
Scalable design – as new logs are uploaded to the bucket and re-ingested, the agent's knowledge continuously grows.
Channel-agnostic access – the same agent can be surfaced through the console, a Python script, or any production chatbot application via its endpoint.
Best Practices
Prefer Structured Logs
JSON or CSV formats retrieve more precisely than unstructured text, since fields like integration_name and error_message can be matched semantically.
Capture Resolution Details, Not Just Errors
Alongside the raw error message, include the root cause, resolution steps, and any workaround so the agent can answer “how do I fix this” questions, not just “what happened.”
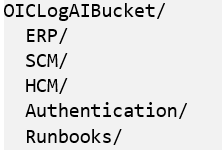
Organize the Bucket
Use folders/prefixes to separate content by domain, for example:
Refresh the Knowledge Base Regularly
Whenever new log files are added to the bucket, trigger a new ingestion job on the data source so the Knowledge Base stays current.
Keep the Agent Instructions Focused
A tight system prompt that tells the agent to answer only from the Knowledge Base reduces the chance of the model guessing or hallucinating an answer.
Harden the Client Before Production Use
Add proper exception handling, retries, timeouts, session lifecycle management, and secure credential storage (for example, OCI Vault or instance/resource principals) before turning the sample Python script into a production chatbot backend.
Conclusion
This example shows how a small, well-organized set of Oracle resources – an Object Storage bucket, a Data Source, a Knowledge Base, and a Generative AI Agent – can be combined to turn historical OIC error logs into a conversational troubleshooting assistant. With the Agent Endpoint retrieved and a simple Python client wired up, the same assistant can also be embedded into any chat application your organization already uses.
The whole pipeline is:
Object Storage Bucket -> Data Source -> Knowledge Base -> Generative AI Agent Agent Endpoint -> Console Chat | Python Client | Any Chat App
As more OIC logs, troubleshooting guides, and support playbooks are added to the bucket and re-ingested into the Knowledge Base, the assistant becomes progressively smarter – without any change to the underlying agent configuration or to the client applications calling it. This pattern is a strong starting point for any team looking to build enterprise AI assistants over Oracle Integration Cloud diagnostics, or over any other domain-specific operational data, and to expose that assistant through the chat channel of their choice.